


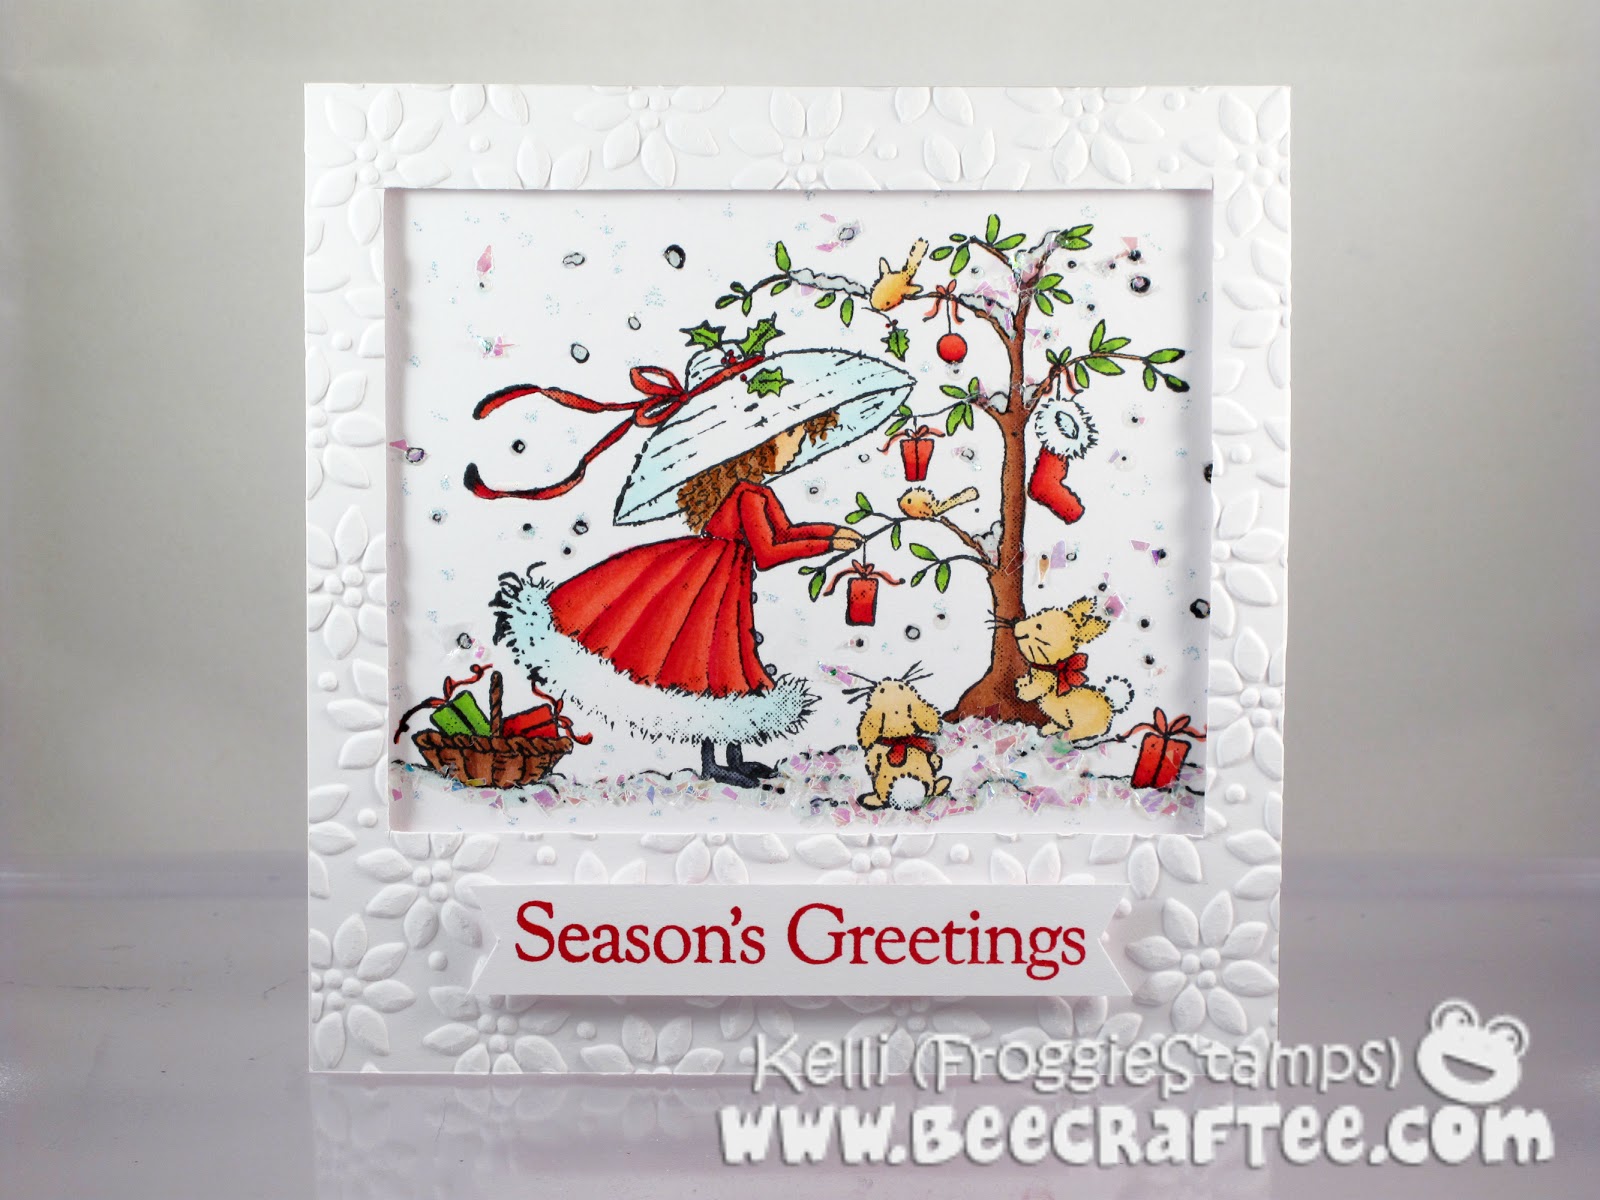
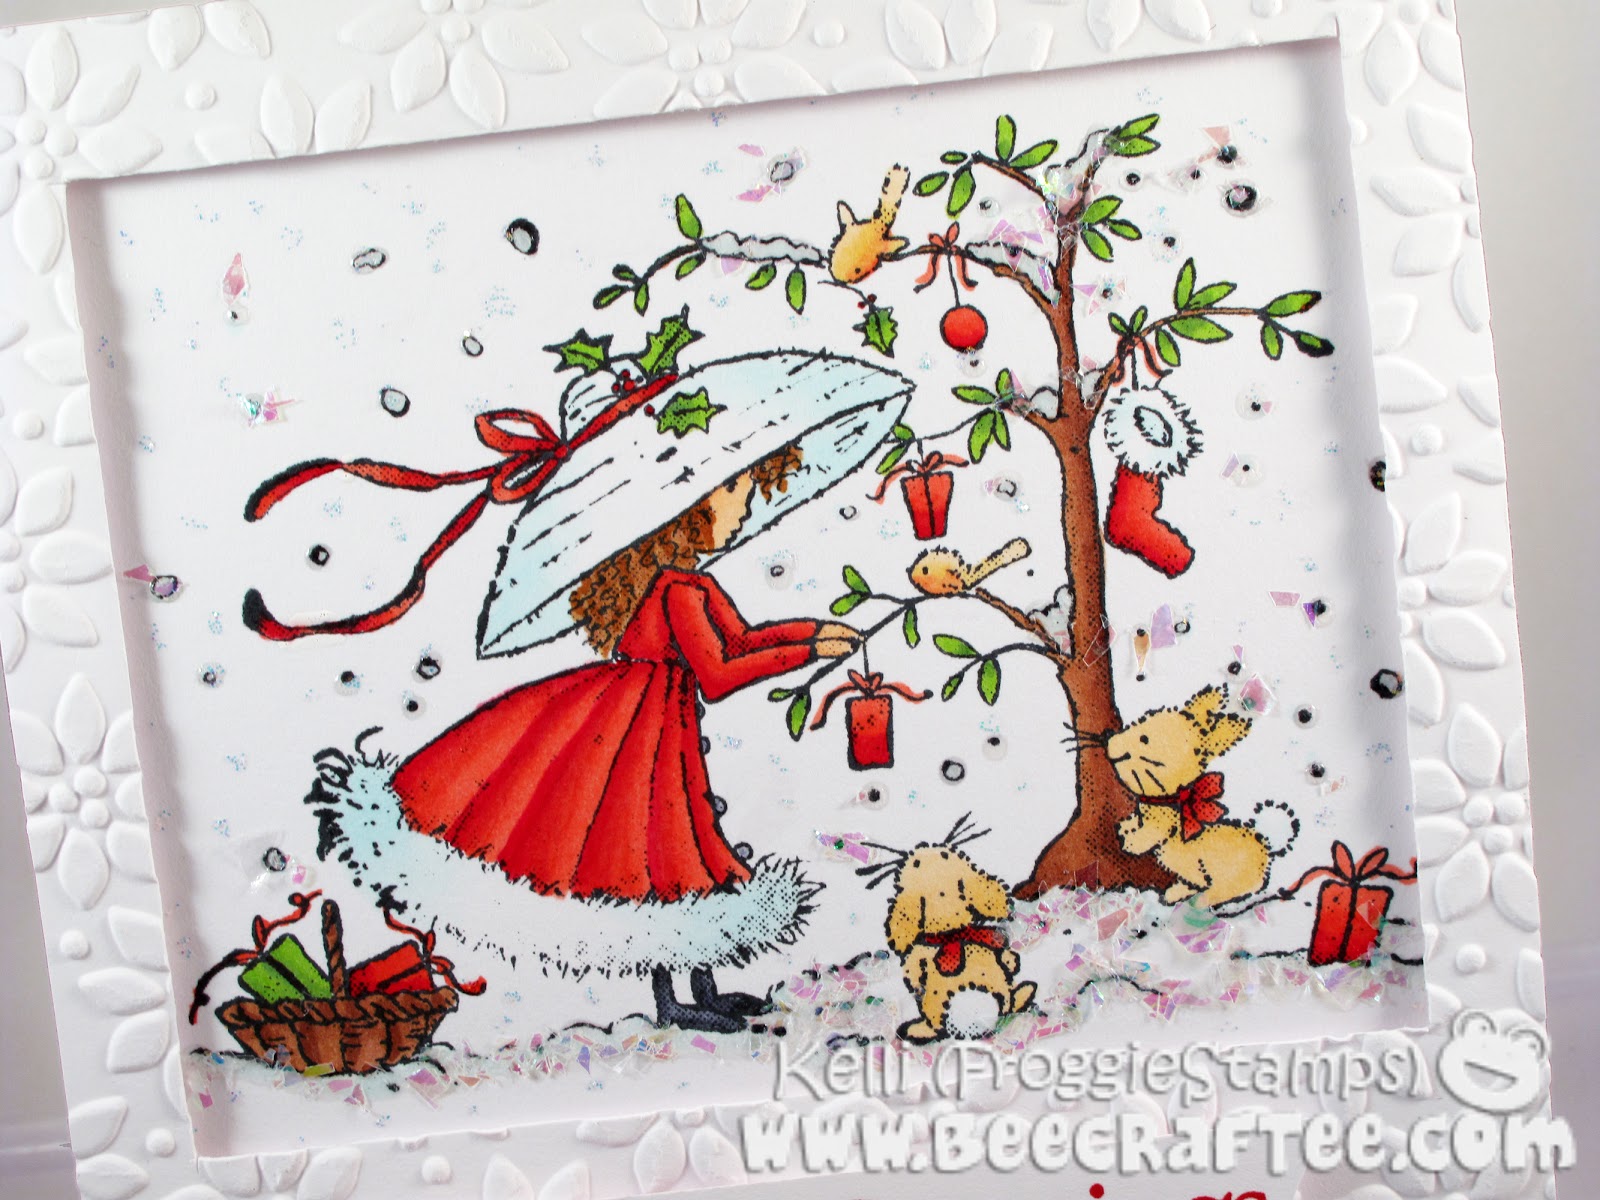
Season’s Greetings
Hi, everyone! It’s Kelli here today and I have a Christmas card to share with you. I totally love this time of year for card making! I used the Wild Rose Studio – Hanging Gifts stamp. I think this line of stamps is sooo pretty which is why for this card I wanted the image to be the main attraction without much else going on.
I stamped it in Memento – Tuxedo Black ink and colored it with Copics:
R29, R27, R24, R22
E51, E37, E35, E27, E25, E23, E02, E01, E00
C7, C5
YG25
G24
Y23
B0000
After I colored everything I added some Glossy Accents to parts of the snow and added some Stampendous – Shaved Ice for some shine.
To help the image stand out I added a white card stock frame that I embossed with an embossing folder. I finished it off with a sentiment from my stash.
Thanks so much for stopping by. Have a great day! 🙂

Wish Upon A Star

Hello everyone! Marie here and I want to share a card I made with the wonderful stamp from Stampavie – Tina Wenke’s “Bird on Dogwood Branch”. I just adore this image. Some of you may know that I have three wonderful feather babies and this image really spoke to me. The happy little expression on this bird’s face just makes me smile
Today I would like to share how I colored the adorable image.
Techniques:
- Copic Alcohol ink markers
- Tip to Tip inking
- Flicking Method
- Sponging

Copic RV23 was applied using a flicking motion (wrist action like a check mark🙂
I find the sketch markers have wonderful brush tips for this technique but it is a matter of personal preference.

Copic R21 was applied in the same method from the inner edge of the shadow area inward.
Leave the very center (highlight area) white.
For more contrast, I added RV32 sparingly to the shadow areas of the petals and tips.
Color can always be added but it is very difficult to lighten the image if it becomes to dark.
I prefer to keep my ink wet for ease in blending. Working in small areas will allow your ink to remain wet and the blend will be smoother.
Avoid trying to color the entire image with the shadow, then the mid-tone and then the highlights. Work with a petal at a time.

For the highlighted area, touch the tip of your Copic colorless blender to the RV21 and flick color from the inner edge of the RV21 working with a light touch.
Remember – a colorless blender does not erase color, it just moves it. The more times the brush goes over the highlighted area, the darker it becomes.
Keeping tthe motion light will apply color and yet maintain the wonderful highlights you want for your image in order to make it “pop”!

I believe that flowers are not all uniform. That’s what adds interest!
Flowers in the distance have more grey-tone to them and are a little
lighter in color.
I used a touch of RV42 for my darkest shadow area and blended out with RV32,
The grey-tone increases on Copics when you use higher numbers
I blended toward my center with RV23 , RV 21 and my tip to tip with RV21 and colorless blender.
I believe the flower in the distance is slightly lighter and it has a little more grey-tone than those in the fore-front.

In order to give a little more variation in my flowers so they look a little more realistic, I wanted to create a color change to the one on the right by making it appear slightly farther than the ones in front. I used the RV42 and RV32 . I then touched the colorless blender to the RV32 and bended lightly over the highlights.
Variations are nice!

The leaves and stems were colored with Copic G28, YG63 for shadows and mid-tones and G40 for highlights.

The happy little bird was colored using B14, B00 and a touch of B34 for my darkest shadow area.
Grey tones were applied to the very bottom of the bird using C5 and C3.
White flecks were added sparingly to the outer feathers in a couple places with Copic Opaque Ink.
A tiny dot of Copic opaque white ink was applied to the eye.
The background was sponged with Memento Tangelo, Cantaloupe, Angel Pink, Summer Sky and Danube Blue ink pads.
The layers and designer paper were applied. I used my new Cameo (big smile) to create my flourishes.
That is all I have for today. I just want to remind you that our MarkerPop Blog has a great new challenge going on so stop by and check it out!
Have a great week and thank you so much for spending some time with us!
![]()
MarkerPop Coloring Challenge #9
Hi everyone! Welcome to MarkerPop Coloring Challenge #9!
Samantha here, & our new challenge is going to be super fun. I hope that you have as much fun with this one as we did! The design team is sharing all projects using Washi tape to go along with our challenge (but you DO NOT have to include washi tape on your projects). If you have never heard of washi tape, let me tell you a little bit about this fun embellishment. Washi tape is a japanese rice paper. It is semi-translucent & it comes in tons of gorgeous colors/patterns. You can use it as faux ribbon, pleats, borders, masking tape, faux lace, etc. It is just such a fun, neat product to use on your projects. If you have a tip or a fun way to use washi tape, please leave us a comment and tell us about it! We would love to hear about how you use it.


THE CHALLENGE: Paper Piecing + Shading
Do some paper piecing on your colored project! But wait, don’t paper piece the whole thing, also do some shading with your favorite markers from the MarkerPop store. We’re showcasing some washi tape this week, but you DO NOT have to use Washi tape like we did –as long as you paper piece & color something, it counts! You may play along with other challenges, but excessive challenge pile-ons (7 or more challenges) will result in disqualification for our amazing prize. As always, have fun creating!

THE PRIZE: Three rolls of Washi Tape of winner’s Choice!
One entry will be chosen at random to receive our prize. Three additional entries will be chosen for the Top 3 based on their amazing coloring skills. The prize winner and top three can all proudly post their brag buttons on their blogs for the world to see! Entries are due on Sunday, October 28th at noon EST.
We are continuing our comments contest as well. Leave a comment on one or more blog posts between now and when our challenge winners are announced for a chance to win a $10 gift certificate!
Here’s what the team came up with this week:
Melissa used the Bright Bean stamp from the Greeting farm to do some shading and paper piecing. Notice how she used the washi tape to make some cute banners on her project:

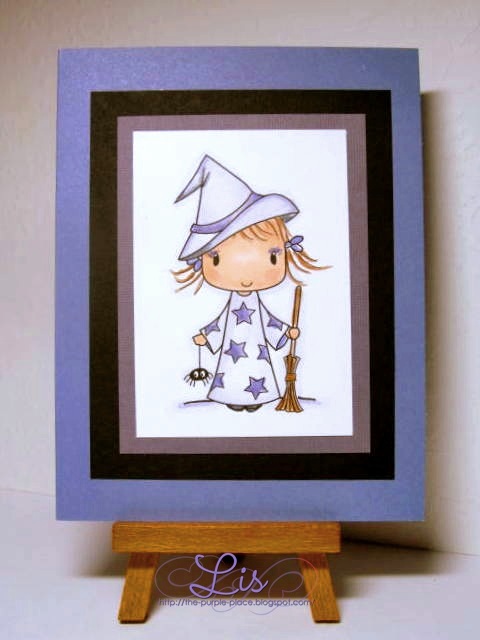
Marie used a Magnolia image called Wizard Tilda and paper pieced her outfit. Marie made some grassy pleats with her washi tape.

For my project, I used this cute little bride from the I DO stamp set from The Greeting Farm & paper pieced her gown and veil. I used my washi tape to create some decorative borders.

Hopefully we gave you some ideas on how you can do some paper piecing and shading. Now it’s your turn to show us what you can do! I hope you will play along with our fun challenge this week! Add a direct link to your project below:
Winners MCC#8 + Giveaway!
Hi everyone!! Samantha here to announce all the winners from our last challenge. Don’t forget to leave us some love on our blog posts throughout the week for a chance to win a $10 gift certificate.
Also, we are having a super giveaway over on the MarkerPop Facebook page! Click here to go enter our giveaway now!

Now, here are the winners!
The winner of the MarkerPop Coloring Challenge #8. chosen at random, is. . . 36. Lisa
Lisa has won one Gorjuss single stamp. All the Gorjuss stamps can be seen here!
Our comments winner is. . .
Beverly Jordan
Just gorgeous girls!! Love these cards and your black coloring techniques!
And finally, here are our Top 3 picks, who were chosen for their awesome coloring skills:


Congrats everybody!! Make sure to grab your brag buttons from the bottom of the blog! Lisa and Beverly please email us at info@markerpop.com with your mailing info so we can get your prizes out. Lisa, also let us know what Gorjuss single stamp you would like.
