
MarkerPOP! Challenge #19
Hi, everyone! It’s time for Challenge #19! As you all know from the last challenge, we have an AMAZING sponsor for this month!

All That Scraps is the home of C.C. Designs stamps which we all know and love!
THE CHALLENGE: Use Glitter
Create a project and add glitter to your colored image.
You may play along with other challenges, but excessive challenge pile-ons (7 or more challenges) will result in disqualification for our amazing prize. As always, have fun creating!

THE PRIZE: New Release – Sweet November Bufly’s Rubber Stamp
Given by our amazing sponsor, All That Scraps (C.C. Designs)! Just imagine all the glitter you could add to those wings!
One entry will be chosen at random to receive our prize. Three additional entries will be chosen for the Top 3 based on their amazing coloring skills. The prize winner and top three can all proudly post their brag buttons on their blogs for the world to see!
Entries are due on Sunday, March 31st at noon EST.
We are continuing our comments contest as well. Leave a comment on one or more blog posts between now and when our challenge winners are announced for a chance to win a $10 gift certificate!
Now, here’s Tina with her awesome glittler project!
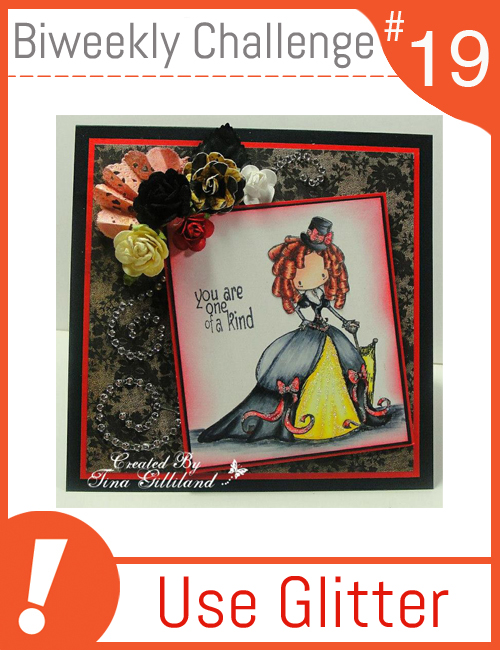
Hi everyone!!! Tina here with a little “blinged up” inspiration for you!!! Today I wanted to show you how I add a little glitter to my images to get it just a tad bit of bling without overdoing it to much.
Are you one who doesn’t like the mess using glitter can make??? Well… today I’m going to tell you how “I” handle my glitter… or not. 🙂
The adorable image I used is from Tiddly Inks, “Stylish Friends”. I used my Copic markers to color her and one of my Touch Twin markers as you can see in my pic below. The nice things about both markers is they CAN be used together since they are both alcohol based! I love that because I was having issues with my “skin tone” Copic so instead of messing to fix it right now, I just used a comparable Touch Twin. 😉 I used my Cryogen paper to stamp my image on prior to coloring.
After coloring, to help make adding glitter easy, I use a glue pen” I love these because I can control EXACTLY where I want the glitter to go. I just used a few streaks rather than having to glue a whole section and adding more glitter than I want.
The folded “fan” in the corner is part of a paper doilie which I folded but prior to doing that I added a bit of Mister Huey’s, Overdue Real Red, color mist then shooting it with just a bit of Heidi Swapp’s Color Shine, Mustard, to add a bit of yellow and iridescence to it. BUT… once I got misting, I didn’t stop there. My little red rose was also white until I hit it with the Mister Huey’s Red as well. I LOVE misting flowers and if you just want a flat color, Mister Huey’s is perfect. They dry really fast too!!!
I hope you give adding glitter to your card a try. It doesn’t have to end up all over your desk and it really does add just “enough” bling to an image, especially if you only add it to certain areas and not the entire image.

Here are the Copics and Touch Twin markers I used for my card….

We can’t wait to see what you come up with for this ‘Glitter’ challenge! 🙂
Trackback from your site.

Comments (1)
Linda Simpson
| #
Great inspiration and lovely blog.
Hugs
Linda xxx
Reply