


TGF – Blush Bonnie
Dana here and all I can say about this stamp is wow! I mean, seriously…. WOW!~

Meet Blush Bonnie from The Greeting Farm . She was so much fun to color! I knew I wanted her to match these amazing papers and brads from Wild Rose Studio. I went with oranges for her dress, sock and shoes and I really like how she turned out. I used Tim Holtz Spiced Marmalade to add some orange to the “Thinking of You” (which comes with the image) and also to some of my flowers.
Here’s a close up:

Here’s the colors I used to color her:

I should’ve crossed off YR02. It’s so close to YR65 that I didn’t bother using it. You can see how I do that halo effect around my images here. This time I used V93 and V91 instead of the blues and went pretty heavy with the colorless blender to give it that blotchy look. I am really loving V95, V93 and V91 for shadowing atm (at the moment). They are very grayed down purples and I am finding them perfect for shadows. Love them!!
I used Copic Opaque around the edge of the striped panel. I also used it with my stylus to put the dots around the scalloped die cut. The other unsung heroes of every card I make is my Memento Ink and my X-Press It tape and papers.
Don’t forget to play play along in our challenge and to join us on Facebook : )
Hugs~

Tuesday Tips and Tricks: Distress It!
Hey everyone! Samantha here with this week’s Tuesday Tips and Tricks. Today’s lesson is all about Rock Candy – the crackle paint, that is! Sorry candy lovers, this one is all scrap related 🙂
If you don’t know about Distress Crackle Paints, let me tell you a little bit about them before we get started. Rock Candy is a clear, glossy crackle paint. The crackle paints in the Ranger Distress line are one step crackle paints. Now, if you have ever tried to crackle paint a piece of furniture, then you will definitely appreciate the idea of a one step crackle paint (usually crackle paints are two steps and very difficult to achieve the correct ratio of the two mediums involved).
It comes in this neat little jar, and the screw top lid contains a paint brush! That makes these crackle paints super easy to use!

So on my project below, I used the Rock Candy crackle paint on my main image:
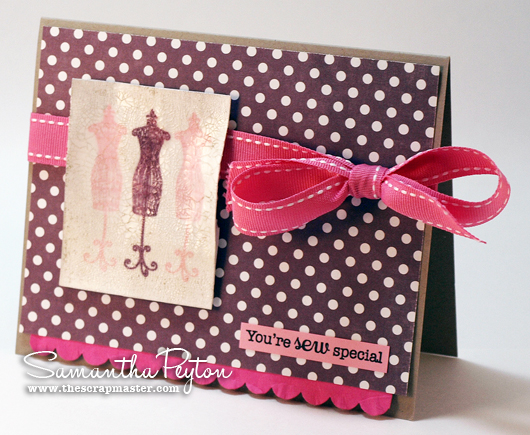
Here is a close up so you can see the awesomeness:

I did a really neat technique with the dress form’s image. First, I stamped the images in pink and purple inks.
Next, I painted over them with Rock Candy Crackle Paint. I used a pretty thick layer of paint. You don’t want to go too light on the crackle paint or else you won’t be able to see the crackles.
It takes a while to dry, and on the bottle it says once cracks start to form you can gently heat it with a heating tool to finish drying. Well, being the impatient person that I am, I did that! I have learned from heating Distress crackle paints in the past. . . heat setting gives you smaller crackles. When air drying, if you use a thick layer of paint, you will get larger crackles. In contrast, with a thinner coat of paint, you get much smaller crackles.
When it was dry, I inked over it with some light brown ink to give it a little bit of a weathered look. Then I was left with this neat cracked glass type effect over the stamped images!! Neat, huh?
Now head over to the iCopic store and pick up a bottle of Rock Candy and experiment away. This stuff is so fun and gives such a neat effect!
Have a wonderful day, folks!

iCopic Weekly Challenge #42
Hello everyone! Samantha here to bring you this week’s challenge.
The Challenge: Fur
Use your Copics to color some fur! Make your fur coloring look as smooth or as textured as you would like. Animal stamped images are so popular right now so I thought we should focus on that for now.


Add a direct link to your challenge project below. Projects are due on August 14th at noon PST. A winner will be chosen at random to receive this week’s prize AND be showcased right here on the iCopic blog Sunday evening!
For my inspiration project, I focused on LONG fur. I first colored the furry areas in using some lighter shades Then I added the long strands of fur in various darker colors to provide all the texture to my image. I added more long strands around areas where his body would have shadows to add some additional shading.

Copic colors used: E30, E31, E55, E29, E23, E25, YG00, YG13, BV0000, BV00, Y18, and Y19. The adorable image I used us from Wild Rose Studio, called Milton with Daisy. The sentiment is from a brand new stamp set from SP and Company Stamps, called Sewing Chic. The green/yellow patterned paper is also from Wild Rose Studio.
iCopic Weekly Challenge Winner
Hey everyone! Samantha here to bring you the winner of our last challenge.
And the winner, chosen at random, is. . . 2. Deonna B
Deonna created this beautiful project for the Skin Tone Challenge:

Congrats! Deonna, make sure to email us at info@icopic.com so we can get your prize out to you.
And everyone, please join us back here tomorrow when we announce another super challenge!!
Hope you have a wonderful evening!!
