$10 Gift Voucher - Leave a Comment

Author Archive

Simple Watercolor Backgrounds

Written by carisa_zglobicki. Posted in Blog Hop, Tips & Tricks, Tutorials

Paper_Smooches_Pretty_Pink_Posh_Watercolor_Card

Hi everyone! Carisa here with you today and I am so excited to be participating with MarkerPop! in the Pretty Pink Posh Watercolor Blog Hop today and after I sent in my card, I thought I would create a video sharing how I created my watercolor background using Faber-Castell Gelatos and then creating a card with that background by using my Copic Markers to color my images – who says you can’t combine watercolor and Copics?! In fact, I have seen this type of technique used quite a bit and loved it because I have to admit, I’m a bit of a compartmentalized crafter. If I am using my watercolors, I tend to stick to that and same goes for Copics – it was flying against the wind for me to put this card together, but I honestly love how it turned out and don’t be surprised if you see this more from me!

Paper_Smooches_Pretty_Pink_Posh_Watercolor_Close1

Here is a close up of the cute little critters from Paper Smooches Party Posse stamp set. Seriously, they just make me smile and they are looking pretty awesome all stacked up in all their Copic colored glory against that beautiful watercolor background! Do you see that I used the same brown color combination throughout each image on different parts? I learned that from the amazing Sandy Allnock and it seriously is a brilliant way to tie together different elements on your card when you are building a scene or just using different images together like I am. I will definitely remember that tip from now on.

Paper_Smooches_Pretty_Pink_Posh_Watercolor_Close2

Of course, what is a card without some Clear Wink of Stella and Glossy Accents as that perfect bit of subtle embellishment. I even threw caution to the wind on this card and added some twine and gorgeous Pretty Pink Posh sequins – I have DEFINITELY been bitten by the sequin bug for sure! I can’t seem to create a card without them lately!

And as promised…here is the video tutorial showing you how I created the watercolor background on this card and the one for the Pretty Pink Posh Watercolor Blog hop. I hope you will find inspiration from my video and join in the blog hop starting tomorrow!

Copic Markers: Turtle (BG93, BG96, BG99, G07, G09, YG67, R22, R24, R29) / Dinosaur (YR14, YR16, YR09, BG15, BG57) / Hamster (E23, E28, E27, E33, E35, Y02, Y08)

Carisa

Dreamerland Crafts – Copic Speed Coloring

Written by carisa_zglobicki. Posted in Eye Candy (Projects), Tips & Tricks, Tutorials

Dreamerland_Crafts_Copic_Speed_Coloring_Memorial_Day_Card

Hi everyone! Carisa here with you today. Happy Memorial Day – this day, in the United States, is one of reflection and remembrance of those who have fought and lost their lives defending our freedom. While it has come to also signify the beginning of Summer and Barbecue season, it is important to me to remind myself of the true meaning of this day every year. For me, it means taking my family to the Memorial Day ceremony at the National Cemetery.

Dreamerland_Crafts_Copic_Speed_Coloring_Memorial_Day_Close

With this on my mind, I created this card. At the National Cemetery here, you will see rows upon rows of simple white crosses. This was the inspiration for my card. It’s kind of a weird card, I’ll admit, because I’m not sure who I would honestly send this to, but inspiration comes from anything and I had this vision for my card and I do love the way it turned out. Instead of a card,  this might look nice in a simple frame, perhaps given as a gift to someone or in honor of someone you lost while serving our nation. You could easily add a name and dates in lieu of the sentiment I used.

Anyhoo, enough rambling, I created a simple Copic speed coloring video showing how I colored this sweet image. (To watch it on YouTube click HERE) The image I used is from Dreamerland Crafts; they’re a new company we started carrying recently and I think all the images are super sweet. They remind me of children’s book illustrations. This is the first one I picked up but I know I will be getting more. I hope you enjoy the video!

Dreamerland_Crafts_Copic_Speed_Coloring_Memorial_Day_Wink_of_Stella

Of course, I used Wink of Stella and was actually able to get a pretty good photo of the shimmer! I just love it on my images – the perfect simple embellishment every time. Thanks so much for stopping by today – I really hope you enjoyed the speed video – sometimes I wonder about all my rambling on through videos so a speed video every once in awhile with music might be the solution! 😉

Carisa

Coloring on Vellum with Copic Markers

Written by carisa_zglobicki. Posted in Tips & Tricks, Tutorials, Uncategorized

Copic_Coloring_On_Vellum_MFTstamps_Card

Hi Everyone! Carisa here with you today and I wanted to try something different today. Vellum is pretty popular in papercrafting right now and I wanted to try a new technique by coloring on it with my Copic markers. Vellum is a slick surface so there are a couple of ways to approach this when you want to color a stamped image with your Copic markers. Both techniques involve stamping your image and flipping the vellum over to the back to color. I don’t have a video for you today but I did take some photos of the process for you. Let’s get started.

To do this you will need:

Vellum

Stamps

Copic markers

Tsukineko Versamark Ink (we have Tim Holtz Embossing Ink in our store)

Embossing Powder

Embossing Buddy

Copic_Coloring_On_Vellum_MFTstamps_Step1

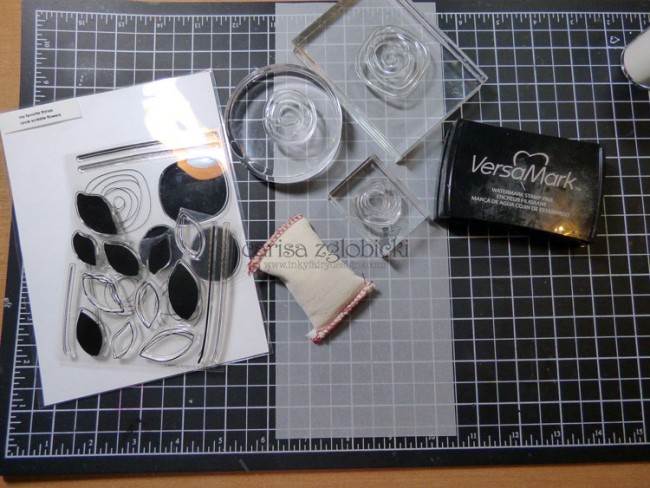
To start, I cut down my vellum to 4.25 x 11. I wasn’t sure how big I wanted my panel to be but I knew I wanted to fit it on a card front so this seemed to be a good size for me to work with to start stamping. I prepped my surface using the embossing  buddy. This places a thin coat of powder on the paper so your embossing powder will only stick to the places you have stamped. Next I started stamping my pattern. I am using the Circle Scribble Flowers by My Favorite Things (there are 2 great matching die sets, too). I used the 3 different sizes of flowers and two sizes of leaves to fill in.

Copic_Coloring_On_Vellum_MFTstamps_Step2

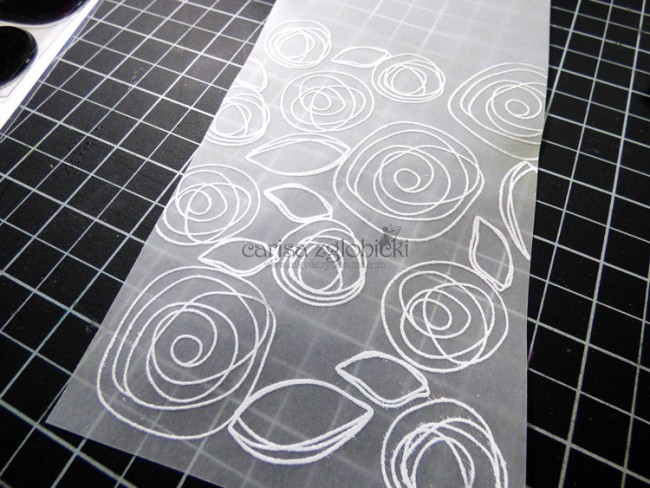
I stamped my images in Tsukineko Versamark Ink (Tim Holtz has a Distress Ink, too) and used white embossing powder. I am fairly new to embossing; what can I say, I started in this hobby by coloring! So, a good thing I’ve learned is to let your heat tool get good and hot before bringing it to your paper – especially vellum! It only takes about 15-20 seconds and then you can bring the heat to your embossing and watch it melt really fast. This helps minimize the warping to the vellum. It will look like this when finished.

Copic_Coloring_On_Vellum_MFTstamps_Step3

You do not want to color on the front where your embossing is for two reasons. ONE: vellum is slick and your markers will take a bit to dry completely – and honestly, it can still smear even once dry. TWO: Embossing can damage the nibs on your markers so you really don’t want to color on the embossed side. If you do (on other types of paper since I know a lot of people like to emboss their images before coloring) just take care along the edges of the embossing. So, turn your vellum over and you’ll be able to see exactly where your images are to start coloring.

Copic_Coloring_On_Vellum_MFTstamps_Step4

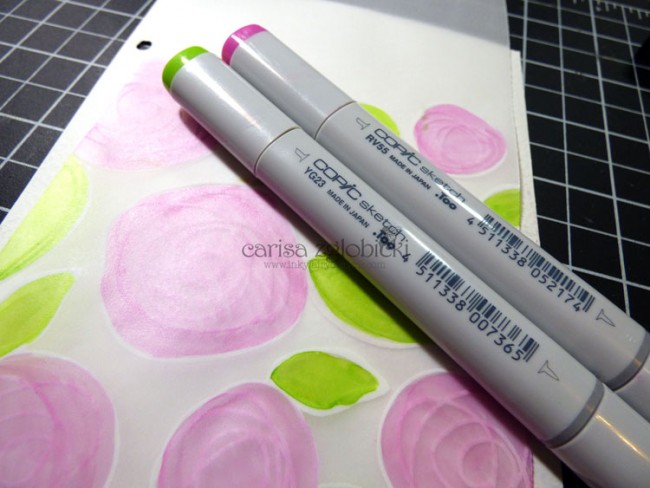
For this technique, I do a very simple color blend. Two at the most. Vellum is not going to blend like your other card stock so it just is pointless to try to blend (well, it was for me, I tried!) I found that keeping it simple is the key to this fun technique. So, I chose one color for my flower and another for my leaves. I ended up choosing another color for the sky around my flowers in the end. Check the end of this post for a list of all the colors used on this project. This is how it will look from the back. Not too impressive. 😉

Copic_Coloring_On_Vellum_MFTstamps_Step5

BUT, this is how it looks from the front!!! So pretty! I think it is so elegant. Don’t stress about brush strokes. I find this adds to the texture and unique look with this technique.

Copic_Coloring_On_Vellum_MFTstamps_Step6

I decided to fill in the white space with blue and did VERY simple outline shading with two shades a bit darker than what I first laid down. I simply outlined the leaves and the scribble flowers with this darker color. I love the way it looks more painted from the front now.

Copic_Coloring_On_Vellum_MFTstamps_Close

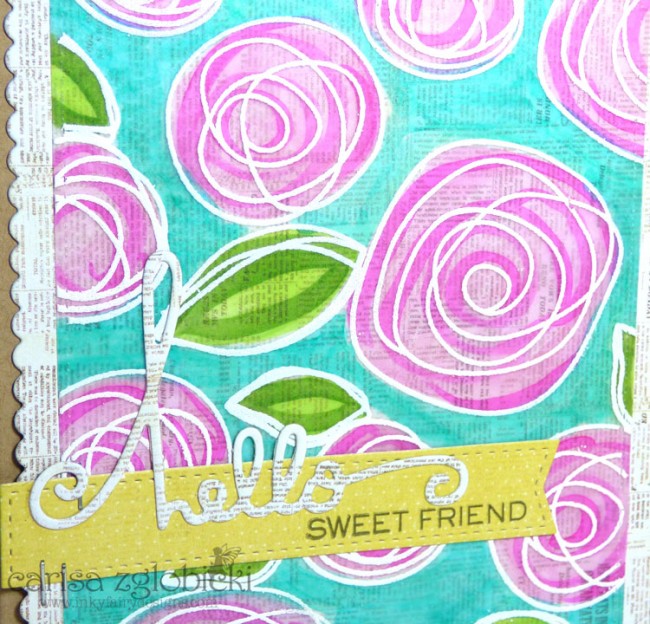
Here is a close up of the colored vellum on my card front. I layer it on some book text card stock. To adhere the vellum, I used tiny dots of Tombow Mono Multi Liquid Glue in the corners and behind the stamping. This helps to camouflage the adhesive but I found that with the pattern peeking through and the coloring, you don’t even  notice it.

Copic_Coloring_On_Vellum_MFTstamps_Card

Here is another look at my completed card. I love it! I have also tried this with Gold and Silver embossing and it looks very elegant. I will share those on my blog at a later date once the sun starts shining again around here and I can get better pictures of that embossing. I chose this stamp set with our current challenge #69: Flowers in mind. I hope I have given you more inspiration today and look forward to seeing your entries! I would love to see your projects using vellum to color on if you have enjoyed this tutorial! Thanks so much for stopping by and I will see you next week with another coloring tutorial.

Carisa

Supplies:

Copic Markers: RV55, RV06, YG23, YG67, BG15

Tsukineko Versamark Ink (we carry Ranger)

White embossing powder

Embossing Buddy

My Favorite Things (Circle Scribble Flowers) (they have 2 coordinating die sets, too)

My favorite Things Die-namics (Blueprints 20)

WPlus9 (Hand Lettered Hello)

Paper Smooches (Hello Words Die)

Prima Marketing, Inc (Coffee Break 6×6 Paper Pad)

Tombow Mono Multi Liquid Glue

Scotch ATG Adhesive

Tim Holtz Tiny Attacher

Coloring on Kraft Cardstock with Copic Markers

Written by carisa_zglobicki. Posted in Tips & Tricks, Tutorials, Uncategorized

Coloring_On_Kraft_Cardstock_With_Copic_Markers_MFTStamps

Hi Everyone! Carisa here with you today and I made this super cute card using some My Favorite Things goodies. When this cute little You Gnome Me set was released, I just HAD to have it! You get that way, too?! haha, you know what I mean. I wanted to use it to make a simple masculine card for my dad’s birthday. I decided I would do some Copic coloring on Kraft card stock. It has been awhile since I have done this and I had forgotten what a neat effect it can give your stamped images.

I created a video with you as well showing my process with this technique as well as a little bit using the new Copic Hex Chart by Sandy Allnock. This was probably the first time I really used it in my coloring and I can see it as a go to resource for myself and anyone using Copic markers whether you are a seasoned colorist or just starting out. I talk a little bit more about why my color choices were different using the chart as opposed to how I would normally pick colors. Also, since I hadn’t colored on Kraft card stock in so long, you’ll see that I start out going light to dark (my usual way of coloring) but then switched to laying down my darkest color first just because I was started to get some bleeding issues with the card stock. When coloring on Kraft card stock you want to pick more vibrant colors than what you would usually go for (most notably my skin colors are very dark and would be very dark on white paper) since the Kraft will soak up a lot of that pigment just by its dark nature.

To create my sentiment, I pieced a few stamp sets together. I probably would re do it as I wasn’t exactly happy with the way it turned out but I just went with it. In the future, when I piece together sentiments like this to create my own, I will probably stamp it on some scrap paper first to make sure I like the alignment and the way it flows before stamping on my card.

Coloring_On_Kraft_Cardstock_With_Copic_Markers_MFTStamps_Close

Copic Markers:

Skin- E21, E33, R21, R32, V20
Beard- W5, W3, W0
Hat- R14, R17, R29, E09
Pants- B24, B26, B29
Shirt- YR31, Y17, Y38
Boots- 100, C7
Shadow- BG05, BG02
Grass- G09, YG67

Carisa

Grab Our Button

i Luv MarkerPOP
Show some MarkerPOP LUV,

add this button to your blog.

I’m a Winner!

I'm a Winner on MarkerPOP Blog
Copy and paste the code under the badge

to claim your bragging rights!

I’ve Made Top 3!

WoHooooo I made it to the Top 3 on MarkerPOP Blog
Copy and paste the code under the badge

to claim your bragging rights!

Visit Us!

MarkerPOP Free Shipping MarkerPOP Boutique
18299 Mount Baldy Cir
Fountain Valley, CA 92708
Toll Free: 1-855-312-1222
Phone: 1-714-249-1222