$10 Gift Voucher - Leave a Comment

Posts Tagged ‘Heat Embossing’

Furr-Ever Friends

Written by Holly Endress. Posted in Eye Candy (Projects), Uncategorized

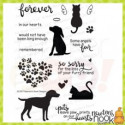
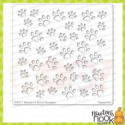
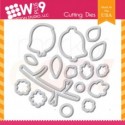
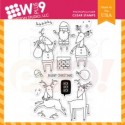
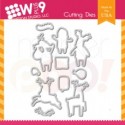
Happy Friday everyone, it’s Holly here today… Have you checked out the July Release from Newton’s Nook Designs? They are celebrating their Four year Anniversary this month with 6 new Stamp sets, a border die set and 4 Stencils. Today I’m using one of the new stencils from the July Release and the Furr-Ever Friends Set from the June Release.

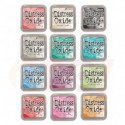
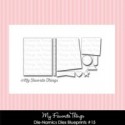
I started with a piece of Bristol cardstock, using the Paw Print stencil form Newton’s Nook. I smooshed some Salty Ocean Distress Oxide onto the back of the stencil. Then I spritzed it with some water and flipped it over and laid it down on the Bristol. I let it sit for a few minutes then I used a paper towel to dab up any excess that may of come through the openings. I heat set the panel with a heat tool. The I die cut the panel using the MFT Blue Prints 15 Die-namics. You can see how I created the background and more ways to use these stencils in the video below.

I stamped the halo image from the Forever Friends set onto the panel with some Gold embossing powder , then I adhered the panel to a White top folding card base. I die cut the stitched cloud from the MFT End of the Rainbow die-namic and stamped the sentiment in the center. I adhered the Cloud with some foam tape leaving enough area to add the cat silhouette. I stamped the cat silhouette in Black ink and I heat embossed the Wings onto some Vellum in Gold. I cut the images out and adhered them to the cloud. For an extra touch of sparkle I added some Mixed Sequins from Neat & Tangled.

We’re also having a sale on all things Newton, so stop by the store and grab your Favorites today!!


Sending Cheer…

Written by Holly Endress. Posted in Eye Candy (Projects), Uncategorized

Happy Friday everyone!! It’s Holly here today with a fun Christmas card using the adorable WPlus9 All Year Cheer set and coordinating Dies.

mp2

This is a great set for creating cards for many seasons or occasions. I decided to create a Winter card by using the little snowflakes in the set. I stamped the snowflakes onto a piece of Tim Holtz watercolor paper and heat embossed them in White. Then I die cut the panel with the Lawn Fawn Large Cross Stitched Rectangle Stax set. Then I smooshed some Tumbled Glass and Mermaid Lagoon Distress ink onto the background. Once it was dry I spritzed some water droplets onto the background and dabbed them off with a paper towel to create a distressed look. Then I adhered the panel to a card base.

mp1

Then I die cut the bird shape and stamped the pieces using some Lawn Fawn inks in Butter, Sunflower, Black Licorice and Hippo. This set works best if you die cut the shape first them do your stamping since it has multiple pieces to create the image. I added a little pink to the cheeks with a R20 Copic Marker. I stamped the tree branch in Walnut in from Lawn Fawn and use the coordinating die to cut it out as well. The santa hat is from the WPlus9 set Santa’s Reindeer. I colored that in with Copics R24, R27 & R29.

mp3

I added some snow to the branch and a few White dots to the bird image with a White Gel pen. The sentiment is stamped in VersaFine Black ink and I used the Mini Misti to ensure I had even coverage on the textured paper. I adhered the bird image with some Foam Tape and the branch directly onto the card with some liquid glue. For some sparkle I added some Sparkling Clear Sequins from Pretty Pink Posh. This is a great card to recreate with different color combos for the bird or background colors, changing them up for the seasons.

Have a Great Weekend!!! We’ll be back tomorrow with our Winners from Challenge #108.

2


Watercolored Dalhias…

Written by Holly Endress. Posted in Eye Candy (Projects)

Hi everyone it’s Holly here today with a set of Watercolored cards. I’m using the Gorgeous Beautiful Bouquets: Dahlias set from WPlus9.

mp2

I started with some Tim Holtz Watercolor card stock and I Heat embossed the images in White. Then I die cut each panel using the Sew Fancy Creative Cuts from Mama Elephant. Once the Panels were all cut out I watercolored each image using Distress Inks. I smooshed each ink pad onto my Craft Mat creating a Palette.

mp1

I added clean water directly to the image first and then dropped in the ink using a slightly damp paint brush. After the first layer was dry I went over the images again adding in some more color to create some depth. Once the images were dry I added the panels to a top folding A2 size card bases. For the sentiments I used a few from the Altenew Label Love set and the Mama Elephant Organic Blooms Set.

mp4

After I created three cards I couldn’t stop…lol These came together so fast and would make a great gift set. I used several Distress Inks in… Wild Honey, Picked Raspberry, Spun Sugar, Mowed Lawn, Spiced Marmalade, Victoria Velvet, Seedless Preserves & Salty Ocean.

Thanks for stopping by today!!

12741890_10208671583206779_8747021650263878740_n


Hello.. Dear Friend

Written by Holly Endress. Posted in Eye Candy (Projects)

Hi everyone… It’s Holly here today and I have a watercolored card using the gorgeous new set from Wplus9 called Beautiful Bouquets: Dahlias. I used the Kuretake Gansai Tambi Watercolor set and some 140lb Canson Watercolor paper.

mp2

I stamped the image onto a piece of watercolor paper and heat embossed it in White. Then I colored it in using the following colors from the Watercolor set. For the Flower I used No. 34 Dark Pink, Leaves No.53 Mid Green and a little No.52 Ocean Green. The Background wash is No.64 Blue. I added clean water to parts of the image and then I added the color using the wet on wet technique.

mp1

After the image panel was dry I die cut the panel using the Blueprints #15 from MFT. Then I die cut the Hello using the WPlus9 Hand Lettered Hello die, from the center of the image. I carefully removed all the pieces from the die and set them aside. Then I die cut four more Hello’s from some Black Licorice card stock from Lawn Fawn. I inlaid one of the Black Hello’s into the center of the image and then I stacked it with three more. I added the original Hello that I die cut from the image over the top of the stacked Hello’s. I added in all the tiny center pieces and then I stamped Dear Friend onto a piece of white card stock using some Lawn Fawn Black Licorice ink and added it with Foam adhesive. I adhered the image panel to a Black top folding card base with my ATG gun.

mp3

Thanks for stopping in today!!! I’ll see ya next week with a new Video!

12741890_10208671583206779_8747021650263878740_n

Grab Our Button

i Luv MarkerPOP
Show some MarkerPOP LUV,

add this button to your blog.

I’m a Winner!

I'm a Winner on MarkerPOP Blog
Copy and paste the code under the badge

to claim your bragging rights!

I’ve Made Top 3!

WoHooooo I made it to the Top 3 on MarkerPOP Blog
Copy and paste the code under the badge

to claim your bragging rights!

Visit Us!

MarkerPOP Free Shipping MarkerPOP Boutique
18299 Mount Baldy Cir
Fountain Valley, CA 92708
Toll Free: 1-855-312-1222
Phone: 1-714-249-1222