$10 Gift Voucher - Leave a Comment

Posts Tagged ‘Doodlebug’

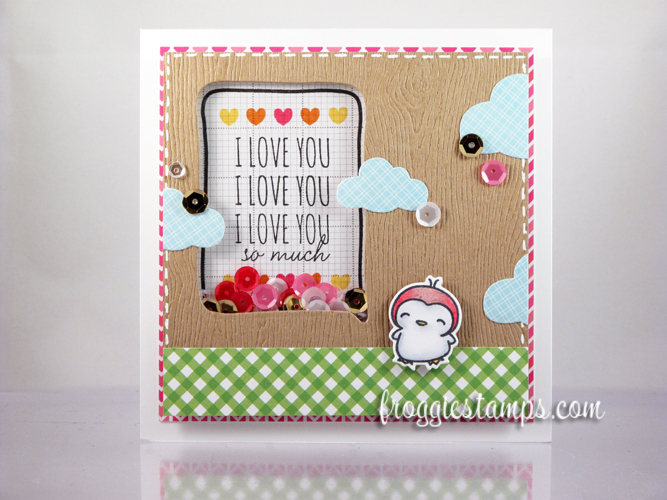
I love you so much! – Shaker Card

Written by Kelli Cortes. Posted in Eye Candy (Projects)

Hi, everyone!  Kelli here today with a fun shaker card to share with you!  When I first saw the Mama Elephant – Love Quotes stamp set and the matching Love Quotes die set I knew I wanted to make a shaker card with them.

The little bird, the speech bubble, hearts, and the sentiment in the speech bubble are all stamped using the Love Quotes stamp set.  The speech bubble cutout and the bird were die cut using the Love Quotes die set.

The little bird was stamped in Memento – Tuxedo Black ink and colored with Copics:
RV14, RV13, RV11
C3, C1, C0
Y35

To get the shaker portion of the card made, I first die cut the speech bubble from some woodgrain kraft card stock.  Then I adhered a clear window sheet on the back side of the kraft card stock behind the bubble.  To make room for the sequins I was going to put in I needed extra height so I put two layers of dimensional adhesive all over the back of the kraft piece making sure that I created a closed in area around the speech bubble.  Then I stamped my sentiment, speech bubble, and hearts onto some patterned paper and carefully placed the sequins over what I stamped.  I took the kraft sheet and lined it up perfectly over the stamped piece with the sequins and adhered them together.  That trapped the sequins between the two layers and made the shaker part of the card!

Most of the patterned paper is from the Doodlebug – Kraft in Color 6×6 paper pad.  The clouds are from the Lawn Fawn – Hello Sunshine 6×6 paper pad.  To adhere the layers together I used dimensional adhesive and Crafter’s Companion – Adhesive Runner.

The colors of sequins that I used inside the shaker and on the front of the card are the Pretty Pink Posh – Sweetheart Mix, Metallic Gold, and Clear 4mm.  I adhered the sequins on the front of the card with some Glossy Accents.

To finish everything off I added some dashed white gel pen lines around the top layer and some Spica Glitter Pen in Clear to the pink part of the bird.

Thanks so much for stopping by.  Have a great day!  🙂

Copic I Love You So Much Shaker 1 Copic I Love You So Much Shaker 2 Copic I Love You So Much Shaker 3

 MP Kelli Badge

Soy happy for you!

Written by Kelli Cortes. Posted in Eye Candy (Projects)

Hi everyone, Kelli here!  Today I have a fun card to share with you that uses the Lawn Fawn – Let’s Roll stamp set!  I stamped all the images in Memento – Tuxedo Black ink onto X-Press It Blending Paper and colored them with Copics:
E59, E57, E55, E29, E27, E25, E23
R29, R27, R24, R22, R20
YR18, YR16, YR14, YR12
G28, G24, G21
YG07, YG05, YG03
Y35, Y13
C3, C1
B0000

I cut all the stamped images out with the matching Let’s Roll dies.  All the patterned paper is form the Doodlebug – Kraft in Color 6×6 paper pad.  I cut out a circle and scalloped circle using some dies that I have and then adhered those to the card base using the Crafter’s Companion Adhesive Runner.

I wanted to keep this card pretty simple because of all the little images, so I just adhered them all to the circles with the adhesive runner or dimensional foam adhesive.

To finish everything off I added the sentiment, a couple dots, and a Pretty Pink Posh – Clear 4mm Sequin.

Thanks so much for stopping by.  Have a great day!  🙂

Copic Soy Happy For You Sushi 1 Copic Soy Happy For You Sushi 2 Copic Soy Happy For You Sushi 3

MP Kelli Badge

Happy Mom’s Day!

Written by Kelli Cortes. Posted in Eye Candy (Projects)

Hi everyone, Kelli here!  Today I have a Mother’s Day card to share with you!

I started off by making the background using Distress Inks in colors: Mustard Seed, Picked Raspberry, and Peacock Feathers from the mini kit #1.  I added color from each onto my nonstick craft sheet and then sprayed it all with water from a Mini Mister.  Then I took a piece of Tim Holtz – Watercolor Paper and dipped that into the little puddles of color.  I dried the whole sheet with my heat tool and then dabbed it into separate spots of color and dried it again.  It came out really fun and bright so I decided to help mute it a little with a piece of vellum that I sewed over the top.  I can’t get enough of these watercolored backgrounds!  I think it’s so fun because the end result is different each time.

The speech bubble is from the Mama Elephant – Love Quotes stamp set and was stamped onto some Doodlebug – Kraft in Color 6×6 patterned paper with Memento – Tuxedo Black ink.  I cut out the speech bubble using the coordinating Love Quotes die set.  The ‘HAPPY’ and ‘DAY’ were stamped using the Lawn Fawn – Milo’s ABCs stamp set and the ‘MOM’s’ was stamped using the Sally’s ABCs set.  The two hearts are from the Mama Elephant – Confetti die.  The grass is from the same Kraft in Color 6×6 paper pad as the speech bubble.

The little dog is from the Lawn Fawn – Critters at the Dog Park stamp set.  She’s stamped in Memento – Tuxedo Black ink and colored with Copics:
Body: C4, C3, C2, C1
Muzzle: C7, C5, C4
Nose: C9, C7, C5
Bow: RV29, RV25, RV23
Hearts in Speech Bubble: RV29, RV25, RV23

I cut her out using the matching Critters at the Dog Park die set.

To finish everything off I added some Pretty Pink Posh sequins in colors: Gold, Clear (4mm), and Sweetheart mix.  I also added some Glossy Accents to the hearts and the dog’s bow.

Thanks so much for stopping by.  Have a great day!  🙂

Copic Happy Mom's Day Dog 1 Copic Happy Mom's Day Dog 2 Copic Happy Mom's Day Dog 3

MP Kelli Badge

Halloween Treat Bag Toppers

Written by Kelli Cortes. Posted in 3D

Hi, everyone!  Kelli here today with a Halloween project for you!  I can’t believe it’s already getting to be that time where we start making holiday projects.  I especially love to make Halloween projects so I thought I’d make treat bag toppers.  One is a lot more detailed and the other is a lot more suited for mass producing.

The base of the topper is from a die that I have that I folded in half.

I used the C.C. Designs – Summer Swing Birgitta stamp for the main image.  She is stamped in Memento – Tuxedo Black ink and colored with Copics:
hair: 100, C9, C7, C5, C0, B32
skin: E13, E51, E50, R20 for cheeks
dress and hair bows: YR18, YR16, YR15, YR14, BV04, BV02, BV01, BV00

I cut her out completely and went around the white core with my Memento – Tuxedo Black marker to make it look more finished.  The great thing about generic stamps like this is that you can color them with any holiday theme you want and use them for multiple projects.  If she was in red and green she could be on a Christmas card, pink and red for Valentine’s Day, etc.  Versatile stamps are a must have for any crafty collection.

All the patterned paper is from a Doodlebug 6×6 paper pad.  This is from last year, but there are so many new Halloween papers to choose from!  I added a button tied with some Purple Crush Baker’s Twine and some googly eyes to finish everything off.

Here is a much simpler one using a lot of the same supplies.  This one would be perfect for mass producing.  Instead of using a die to make the base I just used a piece of cardstock and folded it in half.    I used the same stamp, but this time instead of coloring her and cutting her out, I stamped her in orange ink on a white piece of cardstock.  All the patterned paper is from the same 6×6 paper pad as above.  I used the Purple Crush Baker’s Twine to tie a quick bow around the whole topper and that was it!


Thanks so much for stopping by.  Have a great day!  🙂
markerpopkelli

Grab Our Button

i Luv MarkerPOP
Show some MarkerPOP LUV,

add this button to your blog.

I’m a Winner!

I'm a Winner on MarkerPOP Blog
Copy and paste the code under the badge

to claim your bragging rights!

I’ve Made Top 3!

WoHooooo I made it to the Top 3 on MarkerPOP Blog
Copy and paste the code under the badge

to claim your bragging rights!

Visit Us!

MarkerPOP Free Shipping MarkerPOP Boutique
18299 Mount Baldy Cir
Fountain Valley, CA 92708
Toll Free: 1-855-312-1222
Phone: 1-714-249-1222