$10 Gift Voucher - Leave a Comment

Posts Tagged ‘Copic Multiliner’

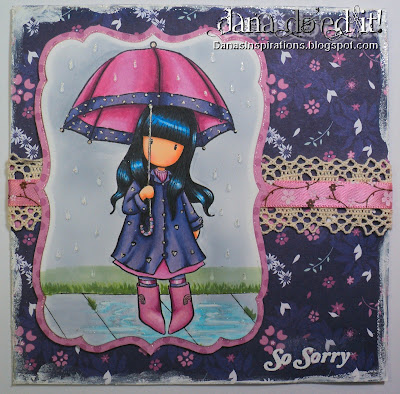
Gorjuss – Puddles of Love

Written by Ash. Posted in Uncategorized

Dana here, and I know I always say “I had a lot of fun with this card” but it’s so true!! Look at this Gorjuss stamp called Puddles of Love:

I thought I would have a little play with trying to actually color a water puddle and rain drops instead of adding them with glossy accents. Here’s a close up:

The raindrops were mostly done with my colorless blender and then I added a little shadow underneath. I was so inspired by these amazing papers from the Wild Rose Studio Summer Fiesta pack!   The sky was airbrushed with C1. I drew my sidewalk with a black copic multiliner.  My sentiment is from SP and Company.   The outside edge of my Designer paper was grunged with Copic Opaque just using my finger.
That’s all for me today but I hope I’ll get to see your creations in our challenge this week : )

Hugs~

Rain or Shine Umbrella Card

Written by Samantha Peyton. Posted in Uncategorized

Hello everyone! Samantha here, bringing you a rainy day card.

Here it is:

This adorable girl image is a stamp from Stampavie called Under My Umbrella.

I colored her in using the following Copic colors:
C1, C3, YR82, YG25, Y15, Y18, Y19, RV10, RV23, RV29, B000, E000, E00, E02, E33, E35 E37, E39, E53, E55, B93, B95.

The sentiment and raindrop background are both stamps from the SP and Company Rain Boots stamp set. The sentiment is actually a straight sentiment, but because SP and Company stamps are clear photopolymer, they can be bent beautifully like shown on this card!

I added a little doodle using my Copic Multiliner SP to accentuate the sentiment.

That’s all I have to share with you today! Don’t forget to play along with the iCopic Weekly challenge, which ends tomorrow. I look forward to seeing what you create for the fur challenge.

Crafthouse Press – Fabulous Lingerie

Written by Ash. Posted in Uncategorized

Dana here and wow, what an amazing stamp I have to show you today!! It is from Crafthouse Press and is called Fabulous Lingerie:

Is that not gorgeous?? All girly and feminine, you just know it had to have some pink and bling : ) I always want to jump to the “good” parts but you can’t achieve good coloring without first good paper and Memento Ink.  I stamped the lingerie in Tuxedo Black and the sentiment from Amy R in Rich Cocoa Brown.  My designer papers are from Wild Rose Studio Girly Polka Dot paper pack.
Our challenge this week is airbrushing and I airbrushed the background of my nestie shape. Since my stamp is all paper pieced I didn’t have to do any masking.  Here’s a close up:

You can see how I created my background using my airbrush and colorless blender by viewing Jan’s post here.
After stamping my lingerie pieces on my patterned paper I added some shading. I used R85, R83 and R81. I cut those out and them Mod Podged some actual lace over the top of it. Those layers ended up being glue to plain white card stock for a little more stability.  Once that was dry and transparent I did a little bit of relininig of the image with my copic multiliner. 
I hope you will check out all the new products at icopic and also join in the challenge this week : )

Hugs~

Beach Baby Layout with Mini Misters

Written by Samantha Peyton. Posted in Uncategorized

Hello everyone! Samantha here!

Starting next Thursday, you will be seeing Kelli here every Thursday bringing you a new project. But for today, you are stuck with me 🙂

Today’s project uses the fabulous Mini Mister, which is one of the new Ranger products that iCopic now sells. I am really enjoying these neat tools!! I also used a sentiment from a new SP and Company stamp set called Round Sentiments I.

After the project photos, I have some tips for how to add finishing touches to your scrapbook layouts.

Some tips for adding finishing touches to your scrapbook pages:

  • Around some of the sticker elements, I used my black multiliner. This creates depth for these elements.
  • Also, you can outline elements with your Copic markers. Around the edge of the circle (it says Happy happy), I used a Copic marker from iCopic.com, BG45 and created an outline to make the element stand out.

For complete layout details, click here!

Well, I hoped you enjoyed my project for today! Alyssa will be back tomorrow with another lovely project. Also, don’t forget to play along with this week’s iCopic challenge!!

Grab Our Button

i Luv MarkerPOP
Show some MarkerPOP LUV,

add this button to your blog.

I’m a Winner!

I'm a Winner on MarkerPOP Blog
Copy and paste the code under the badge

to claim your bragging rights!

I’ve Made Top 3!

WoHooooo I made it to the Top 3 on MarkerPOP Blog
Copy and paste the code under the badge

to claim your bragging rights!

Visit Us!

MarkerPOP Free Shipping MarkerPOP Boutique
18299 Mount Baldy Cir
Fountain Valley, CA 92708
Toll Free: 1-855-312-1222
Phone: 1-714-249-1222