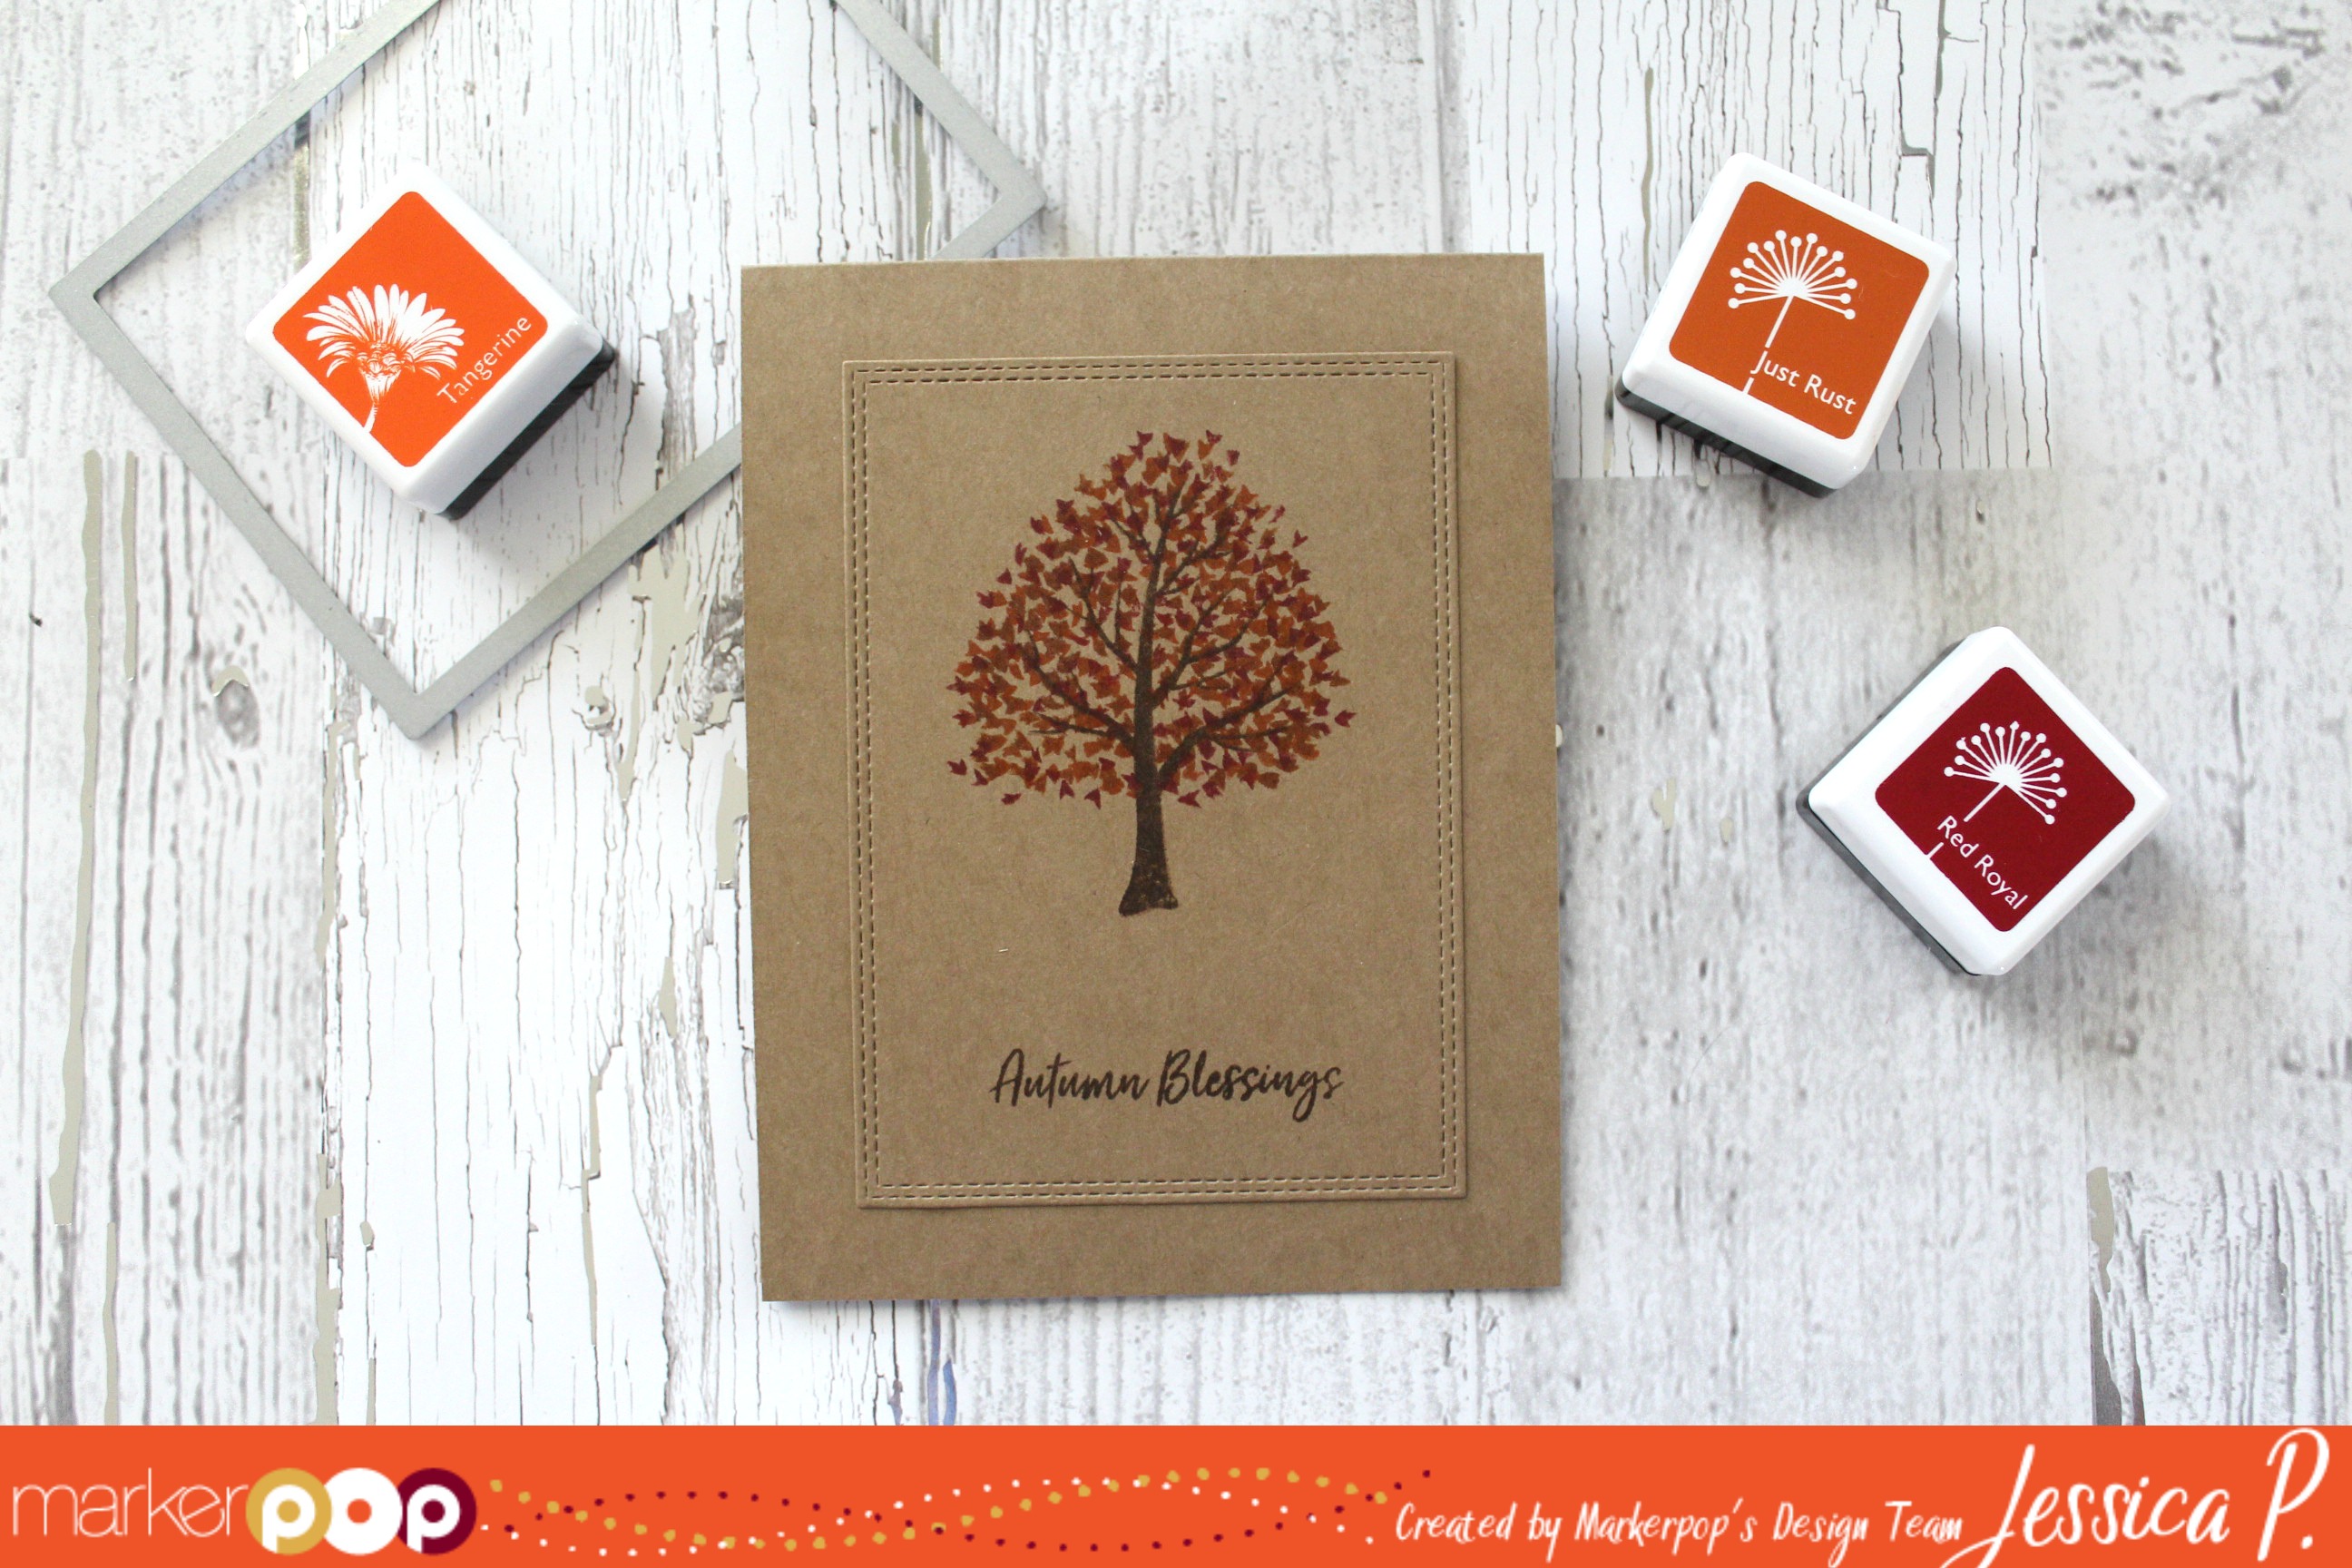
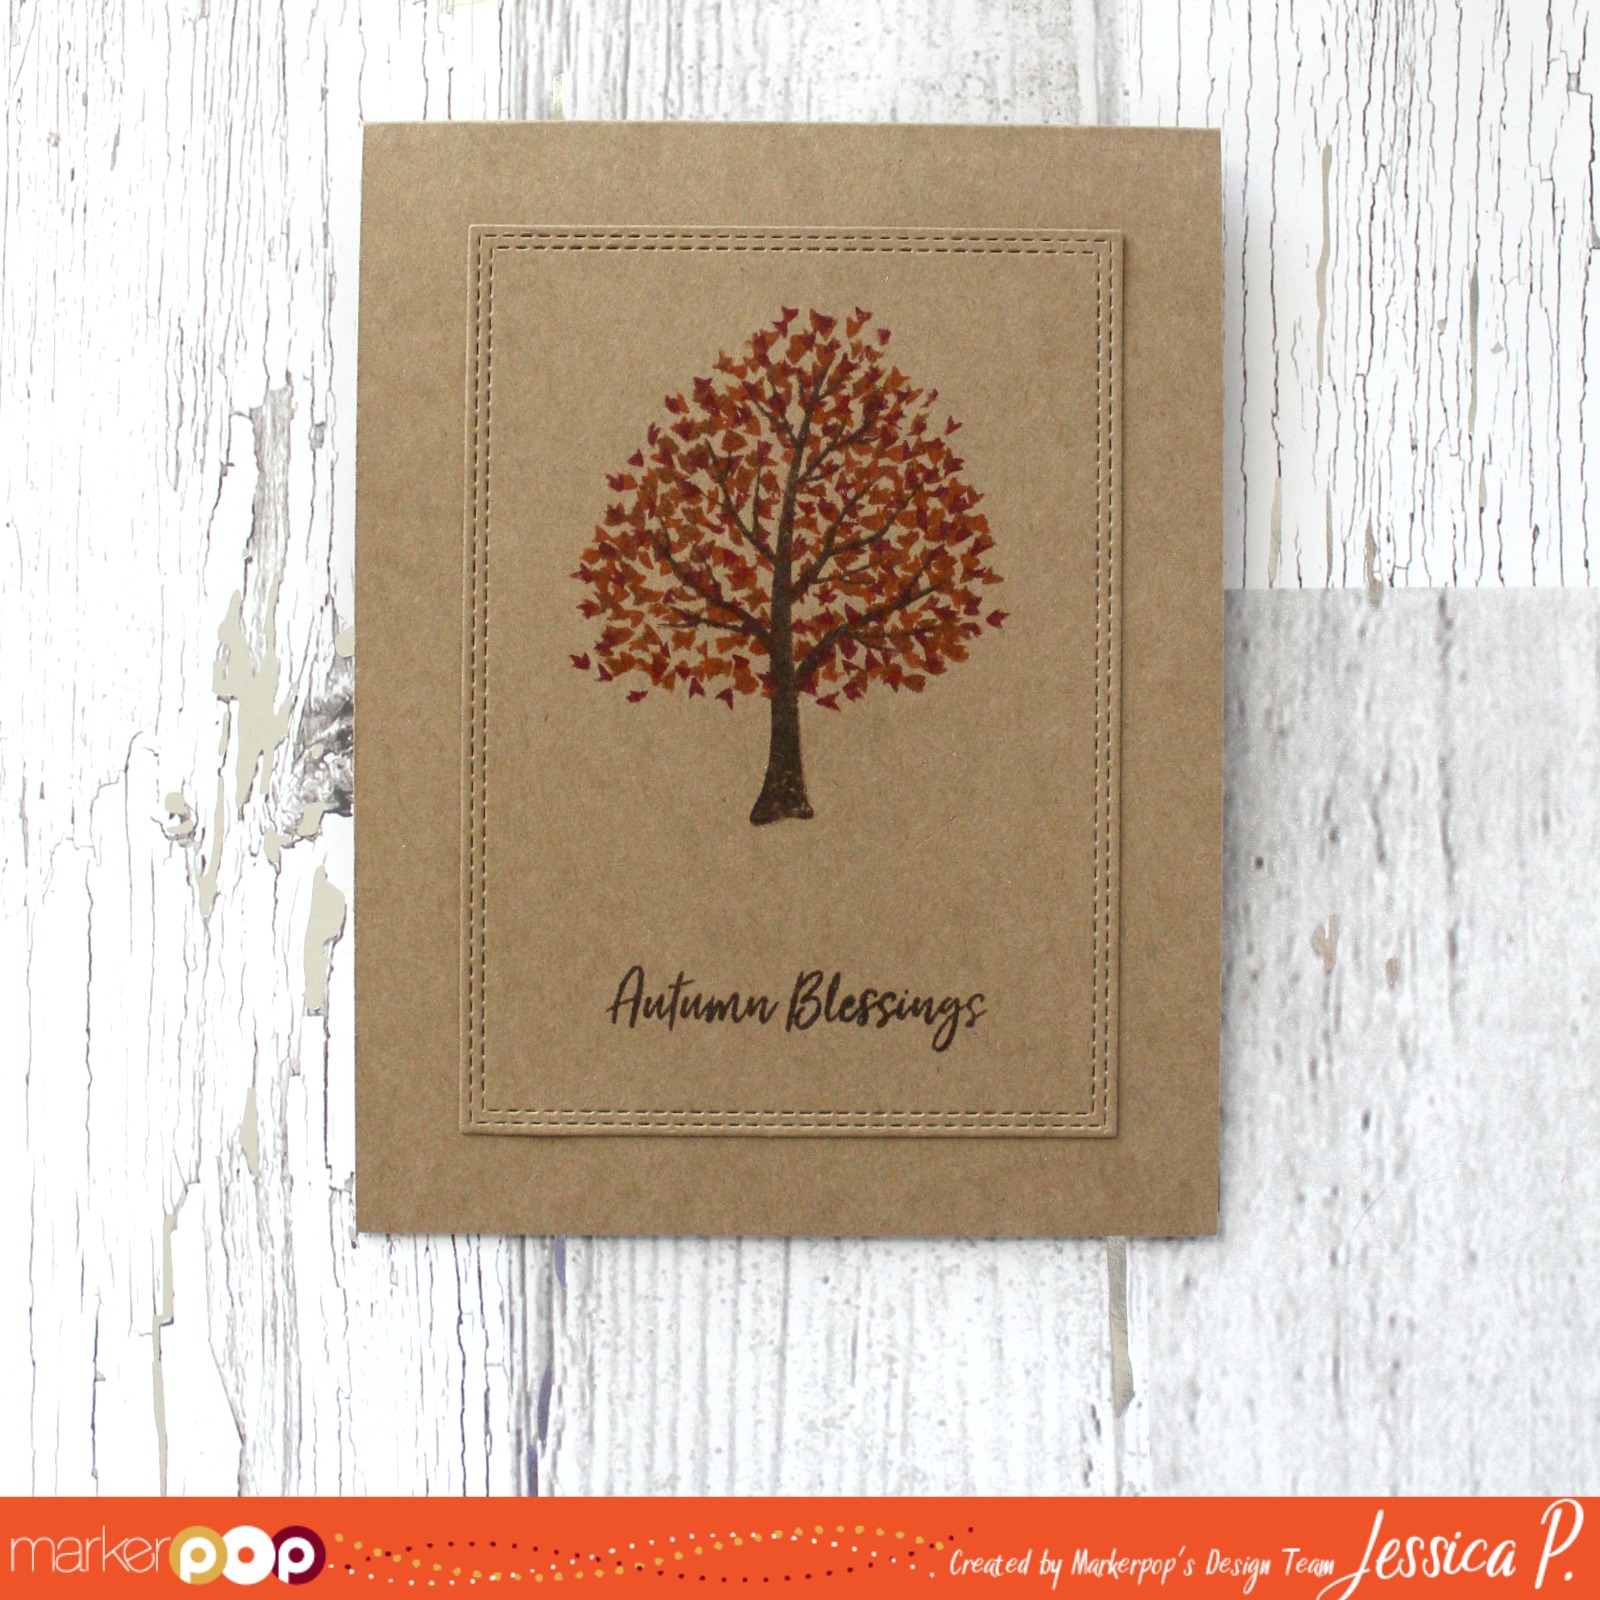
$10 Gift Voucher - Leave a Comment

Give Thanks

Written by Holly Endress. Posted in Eye Candy (Projects), Tutorials, Videos

Happy Saturday everyone!! Fall is in the air in parts of the East Coast and I’m loving it!!! This is my Favorite time of the year. The Newton’s Nook Designs September Release is now in the shop and the new Shades of Autumn is a must have for all your Fall crafting!!

I started with a piece of Tim Holtz watercolor Distress card stock and I stamped each of the leaves several times using Fired Brick, Peeled Paint, Wild Honey, Fossilized Amber and Vintage Photo Distress Oxide Inks. I stamped each image into the ink and then I spritzed it lightly with the Distress Sprayer. Then press the image onto the cardstock and let sit for just a few seconds and lift. You will get a different look depending on how much water you add to the stamp.

Once the background images were all stamped I added some more water to move the color a little and dried the panel with my heat tool. I added some Vintage Photo Distress Ink around the edges with a Mini Ink Blending tool.  I added a few water splatters and removed the excess with a paper towel to create the Distress look. I wanted some gold so I added a few splatters of Distress Spray Stain in Tarnished Brass. Then I dried the panel and adhered it to the card base.

I created a Banner with the same color cardstock and the MFT Blue Prints #29. I stamped the sentiment in VersaMark ink and heat embossed with Gold Embossing powder. I adhered it to the side with some foam tape and added some mixed Gold Sequins for a little sparkle. You can save on your favorite Newton’s Nook Designs stamps and dies in the shop now until 9/19.

You can follow along as I create this card in the Video below…

Have a Great weekend!!!


Fur-Friends Forever

Written by jpascarella. Posted in Eye Candy (Projects), Uncategorized

Hello, MarkerPOP friends! Are you a pet person? If so, what is your favorite kind? I am a dog person. We currently have one dog, Olive. She is an adorable Mastiff mix. Definitely, another child I have to take care of!

Today, I am working with the Pink & Main’s Fur-Friends stamp set and Chameleon markers:

To start this card, I repeatedly stamped the bone image down the side of the card. The dog image is stamped and cut out using a circle die. The image is colored in and attached to the card. To add some extra color to the card, I added three hearts to the card. The final step for the card was to stamp the sentiment .

The following Chameleon markers were used on today’s card:
BR4, BR5, RD2, RD4, YO2, YL3, NU0, NU1, NU3, PR2

Thank you for stopping by and have a wonderful day!

Jessi


Magic Slider Card with Newton’s Nook

Written by lisascreativeniche. Posted in Eye Candy (Projects)

Hi!  It is Lisa here with you today, and I am so happy to share my card with all of you today!  Now before I tell you anything I have a confession to make… I probably made this card waaaaay harder than it ought to be, lol!  But we live and learn, right?  And I learned that I need to own one of the Slider Products available in the store right now to save myself a lot of time! hehehe!  With that being said here is what I have created…

To start I stamped this cute unicorn image from the newer Newton’s Nook Believe in Unicorns stamp set, along with it’s sentiment onto Spectrum Noir Cardstock.  Since this was going to be my “magic” portion of the card I went ahead and colored it in with a mix of Spectrum Noir Sparkle Pens and Illustrator Markers.  I LOVE the brush tip on the Sparkle Pens, they are so easy to control, the shine is incredible, and you can achieve an ombre look with one pen by simply going over one area a few times!

I then set this panel off to dry and stamped the unicorn and sentiment again onto acetate this time.  My MISTI made this easy to keep everything lined up.  Next, I created my pocket window.  I attached the acetate to the inside front of my pocket, and the colored panel to the back.  This left a little slit between the two for me to add the magic slider piece.

The older Lawn Fawn paper I found in my stash was perfect for the card, so I used it as a background.  Everything was adhered to the front of the card, and I added some bright enamel dots as a finishing touch.

Thanks so much for stopping by today and Happy Crafting!

Supplies Used:


Autumn Blessings

Written by jpascarella. Posted in Eye Candy (Projects)

Hello, MarkerPOP friends! Are you ready for Fall? I know that I am. Besides the cooler temperatures, one of my favorite things about Fall is the changing colors of the trees. Sadly, where I live, we do not get to see the drastic change. But I am hoping when I visit the DC area next month that I will be lucky enough to witness a few yellow and orange in the trees!

With Fall on the mind, I brought out the super adorable Hero Art’s Coloring Layers Autumn Trees stamp set to makes today’s card:

Did you know that Hero Art has mini layering ink collections? They make it super simple to coordinate the colors according to a certain theme. Today, I am pairing up the Autumn collection with the Autumn Tree stamp set.

To start this card, I stamped the trunk of the tree with the brown ink. After that I continued with the different layers of leaves using red, orange and rust ink. The sentiment for the card is stamped below the tree. A stitched rectangle die is used to cut out the panel that will be attached to the front of the card. What a simple card to recreate!

Thank you for stopping by! Have a wonderful day!

Jessi


Grab Our Button

i Luv MarkerPOP
Show some MarkerPOP LUV,

add this button to your blog.

I’m a Winner!

I'm a Winner on MarkerPOP Blog
Copy and paste the code under the badge

to claim your bragging rights!

I’ve Made Top 3!

WoHooooo I made it to the Top 3 on MarkerPOP Blog
Copy and paste the code under the badge

to claim your bragging rights!

Visit Us!

MarkerPOP Free Shipping MarkerPOP Boutique
18299 Mount Baldy Cir
Fountain Valley, CA 92708
Toll Free: 1-855-312-1222
Phone: 1-714-249-1222